
Drawings and schematics
Draw shapes, arrows and labels, or a schematic — electrical and electronic, logic, block diagram, pneumatic or hydraulic, flowchart — right inside a text document. The drawing is kept as an SVG picture that any browser or drawing program can show, and that opens again here, editable, by a double click.
Starting a drawing
From the start screen, ✏️ New drawing or schematic opens the editor straight away; Done shows the drawing as a picture, saved with Save as an .svg file. An .svg file opened in the application has an ✏️ Edit the drawing button (a double click works too).
In a text document, choose Insert → ✏️ Drawing or schematic… (also in the right-click menu and the command palette); in a presentation, the same button is in the slide toolbar. To change a drawing later, double-click it (in a document, right-clicking it and choosing Edit the drawing works too). On a PDF, ✏ Draw opens the editor over the page, to add text boxes, arrows and shapes: see PDF › Drawing and text boxes. Any SVG picture of a document opens the same way: its rectangles, circles, lines, polygons, paths and texts become editable; what cannot be edited (groups with transforms, embedded pictures) is kept as it is and moves as a whole.
The whole window
The drawing and painting editors take the whole window, as the other parts of the application do; the tools float over the drawing, which scrolls out from under them:
- ▴ folds the tools into a small bar in the top right corner, leaving the whole window to the drawing; ▾ brings them back;
- ⛶ goes full screen, without the browser's own bars (Escape leaves it);
- ⌘ Commands (Ctrl+Shift+P) opens the command palette, with every tool and command of the editor — folded ones too — found by typing their name;
- in the drawing editor, 🔣 and ☰ show or hide the symbols and the list of objects; in the painting editor, ☰ the layers. An open panel does not hide the drawing: it scrolls beside it.
Tools
| Tool | Use |
|---|---|
| ⬚ Select and move | Click a shape (Shift+click adds to the selection), drag to move it; drag on an empty spot to select everything in a rectangle |
| ▭ Rectangle, ◯ Ellipse | Drag from one corner to the other; Shift draws a square or a circle |
| ╱ Line, ➝ Arrow | Drag from one end to the other; an end dropped on a connection point stays attached to it |
| ✎ Freehand | Draw with the mouse, the finger or a pen; the stroke is smoothed |
| 🖍 Highlight | A wide, translucent yellow stroke over what matters, which stays readable; Shift draws it straight. Select it to change its colour |
| T Text | Click where the text goes and type it in place: Enter for a new line, Escape when done; a double click on a text edits it again. See Formatting text |
| ⌐ Wire | Drag from a pin to another pin: the wire is drawn in right angles |
| ✍ Sign | Draw or import a signature (the pad of the PDF viewer, the remembered signature offered): it is put in the middle as a picture, moved and resized with its proportions kept (Shift stretches it) |
Formatting text
The bar above the drawing has the Size, B (bold), I (italic), U (underline) and Colour of a text:
- while typing, they apply to the selected part only — a word in bold, a larger title line, an amount in red — the rest keeping its look; Ctrl+B, Ctrl+I and Ctrl+U work too;
- with a text selected (not being typed), they apply to the whole text.
Each line is as high as its largest part.
A line selected shows its properties: arrow at the start, arrow at the end, and right angles (routed in horizontal and vertical segments between its ends). Double-click a line to add a bend there, drag a bend to move it, double-click a bend to remove it — for a loop back in a GRAFCET or a flowchart, or a pipe around a part.
A component, a text or a shape is dragged from anywhere inside it — not only from its lines: press in the middle of a resistor or a block and drag. The pointer turns into a cross with arrows over what can be moved.
Zoom and move around
| Mouse | Touch screen | |
|---|---|---|
| Zoom in or out, where the pointer is | the wheel (a pinch on a touchpad) | pinch with two fingers |
| Move the view | drag with the middle button (the wheel pressed) | two fingers moved together |
| − and + in the toolbar | − and + in the toolbar |
One finger keeps drawing; a second finger put down cancels what the first began, then zooms and pans. The same works in the painting editor.
Everything snaps to the grid (10 px). Untick Snap to place freely, or hold Alt while dragging. Grid shows or hides it.
The bar under the tools sets the line colour, the fill (or no fill), the thickness and the dashes — of the selection, and of the next shapes drawn. Align… lines up the selected shapes (left, centre, right, top, middle, bottom); ⬆ and ⬇ bring them to the front or send them to the back.
Symbols and schematics
The panel on the left holds the symbol libraries; type in Search a symbol… (for instance resistor, npn, 5/2, ISO 1219, decision) or choose a library:
- Electrical and electronic (IEC 60617): resistor, potentiometer, capacitors, inductor, diodes (LED, Zener), NPN and PNP transistors, MOSFETs, operational amplifier, voltage and current sources, battery, earth, switches and push button, changeover switch, fuse, lamp, motor, generator, transformer, relay coil and contacts, voltmeter, ammeter, wattmeter, terminal;
- Logic gates: AND, OR, NOT, NAND, NOR, XOR, with the IEC (rectangles) and the ANSI (distinctive) shapes;
- Block diagrams: block, summing point, take-off point, integrator;
- Pneumatic and hydraulic (ISO 1219): single- and double-acting cylinders, 3/2 and 5/2 directional valves, pump, compressor, pressure source, exhaust, check valve, flow control valve, pressure gauge;
- Flowcharts (ISO 5807): start / end, process, decision, input / output, predefined process, connector;
- the graphical languages of IEC 61131-3 (programmable controllers):
- Ladder diagram (LD): left and right power rails; contacts normally open, normally closed, rising (P) and falling (N) edge; coils, negated, set (S), reset (R), P and N. The variable (
%I0.0,Start) is the value, written above; - Function blocks (FBD): TON, TOF, TP timers; CTU, CTD, CTUD counters; R_TRIG, F_TRIG; SR, RS bistables; ADD, SUB, MUL, DIV, GT, LT, EQ, SEL, MOVE; a generic block whose name is its value. Inputs are on the left, outputs on the right, each pin named; the instance gets a name (TON1…) above. The logic gates of the IEC library (&, ≥1, =1) complete them;
- Sequential function chart (SFC) / Grafcet: step and initial step (their number or name inside), transition (its condition to the right), action block, simultaneous (AND, double lines) and selection (OR) divergences and convergences, jump to a step.
- Ladder diagram (LD): left and right power rails; contacts normally open, normally closed, rising (P) and falling (N) edge; coils, negated, set (S), reset (R), P and N. The variable (
A click places the symbol in the middle of the view. Its pins sit on the grid and show as orange dots while the Wire, Line or Arrow tool is chosen. Wires stay connected when a symbol is moved, turned (R, a quarter turn) or mirrored (M); a dot marks where three wires or more meet, none where they only cross.
Each symbol gets a reference numbered by kind — R1, R2, C1, Q1, K1… — and a value, both written beside it. Values are written the usual way: 4k7 becomes 4.7 kΩ, 100n on a capacitor 100 nF, 22u 22 µF, 12 on a battery 12 V. In flowcharts and blocks the value is the text written inside the shape.
Netlist and bill of materials
When the drawing holds electrical symbols, two more buttons appear at the bottom of the editor:
- Netlist (SPICE) downloads
schematic.cir, ready for a SPICE simulator (ngspice, LTspice, Qucs-S…). Wires joined end to end or in a T form one net; wires that only cross do not. The earth symbol is net0; a Terminal whose value is set names its net (VOUT…), the others are numberedN1,N2… Values are written the SPICE way (4.7 kΩ→4.7k,1 MΩ→1Meg); a diode or transistor without a value gets a default model. Parts SPICE does not know (lamps, switches, meters…) are listed as comments. - Bill of materials downloads a CSV file to open as a spreadsheet: one line per kind of component and value, with the quantity and the references (
2, R1 R2, Resistor, 470 Ω).
Keyboard
| Keys | Action |
|---|---|
| Arrows | Move the selection by a grid step (Shift: by one pixel) |
| R / M | Turn a quarter turn / mirror the selected symbols |
| Delete | Delete the selection (the wires attached are kept, loose) |
| Ctrl+D | Duplicate |
| Ctrl+A | Select all |
| Ctrl+Z / Ctrl+Y | Undo / redo |
| Escape | Clear the selection and go back to the select tool |
The Objects list on the right names every shape — "Resistor R1 4.7 kΩ", "Wire", "Text: Input" — for screen readers and for reaching each one with Tab; a click (or Enter) selects it, and the arrows then move it.
Size, description, export
- Width and Height set the size of the drawing; Fit to the content crops it around the shapes.
- Description is the alternative text of the picture, read to those who cannot see it.
- Download SVG and Download PNG (twice the size, for sharp printing) save the drawing on its own.
- Download PDF saves it as a PDF page of its size, drawn with vectors: sharp at any zoom, its text searchable and selectable — a schematic ready to print or send. Greek letters and signs (Ω, µ, ≤, →…) come from the standard Symbol font; a text in other scripts (Chinese…) makes the page a picture of the drawing instead.
Done puts the drawing in the document (or updates it), Cancel leaves it as it was.
In other formats
| Format | The drawing is kept as |
|---|---|
| ODT, Markdown, MDZ | the SVG picture, editable again |
| DOCX | a PNG picture with the SVG beside it (Word 2016 and later shows the SVG, older versions the PNG); reopened here, the SVG is read back, editable |
| LaTeX (.zip) | a PNG picture for \includegraphics, the SVG next to it |
| Print, PDF | drawn sharp at any size |
Painting (bitmap pictures)
For a picture made of pixels — a sketch, a poster, a photo to touch up — use the painting editor:
- from the start screen, 🎨 New painting (a white 800 × 500 picture);
- a PNG, JPEG, WebP or OpenRaster (
.ora) file opened in the application: 🎨 Paint on the picture (or a double click); - in a text document, Insert → 🖌 Painting (new picture)…, or right-click a picture → Paint on the picture;
- Templates and examples → Examples → Poster in layers, to see layers at work.
It takes the whole window, its tools folding away, with the command palette: see The whole window.
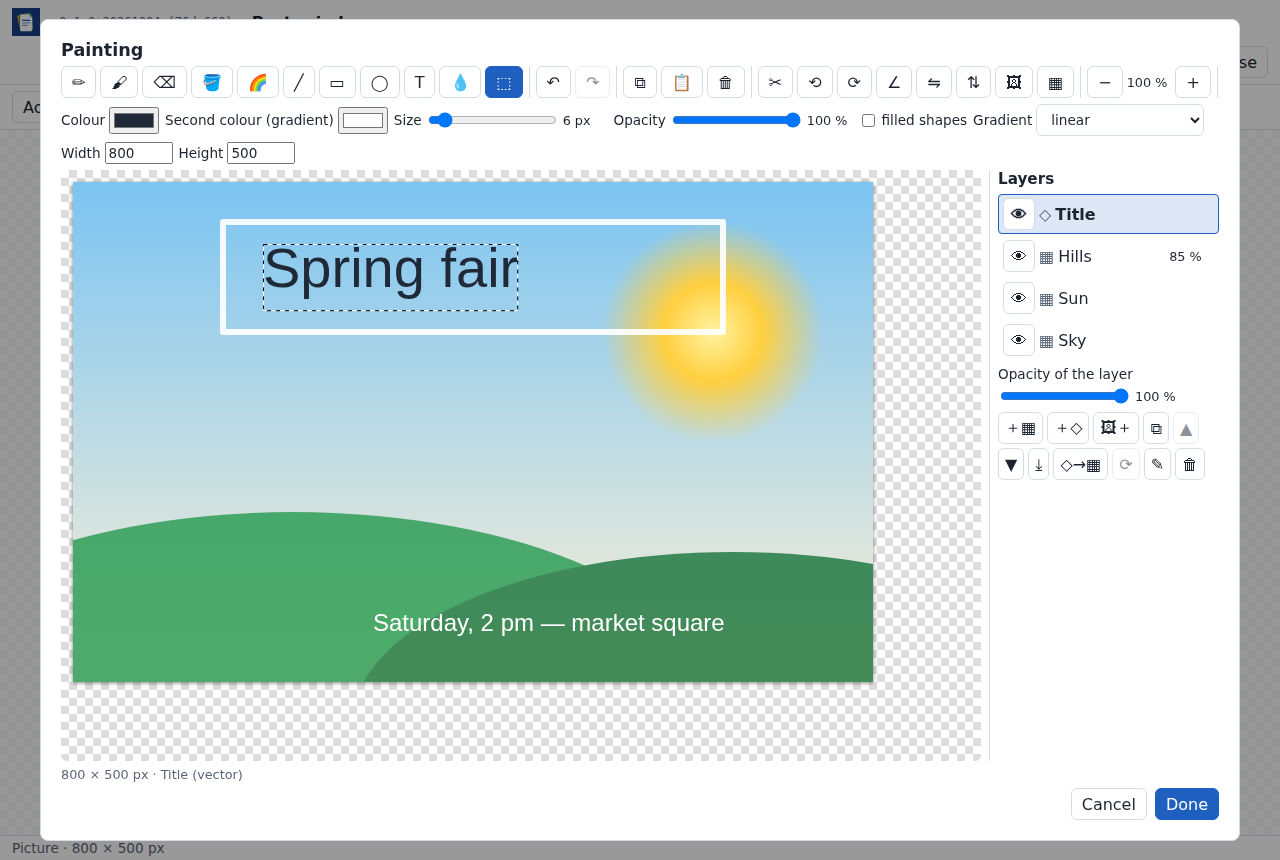
| Tool | Use |
|---|---|
| ✏ Pencil | Hard-edged pixels, for pixel art and fine touches |
| 🖌 Brush | Smooth strokes; the opacity applies to the whole stroke (no darker overlaps) |
| 🖍 Highlight | A wide translucent stroke, yellow at first, that leaves what is under it readable (dark lines stay dark); Shift draws it straight. It keeps a colour of its own: the brush gets its colour back |
| ⌫ Eraser | Makes pixels transparent (white on the background of a JPEG) |
| 🪣 Fill | Fills the area of the same colour around the click |
| 🌈 Gradient | Drag from where the gradient starts to where it ends: linear, radial, turning (conic), from the colour to the second colour — or every hue, turning (a colour wheel). It fills the selection, or the whole layer |
| ╱ ▭ ◯ | Line, rectangle, ellipse; Shift for 45° lines, squares and circles; filled shapes to fill them |
| T Text | Writes text where you click, sized by Size |
| 💧 Pick a colour | Takes the colour of the picture as shown (all its visible layers) |
| ✍ Sign | Draw or import a signature: it comes on a new layer Signature, in the middle; drag it to move it, drag its blue corner to resize it with its proportions kept (Shift: free) |
| ⬚ Select | Drag a rectangle; drag it (or use the arrows, Shift: 10 px) to move its pixels; Delete clears it; Ctrl+C / Ctrl+X / Ctrl+V copy, cut and paste. On a vector layer: picks a shape |
Colour, Size and Opacity set the tool; Width and Height resize the canvas (the picture stays at the top left, the background extended with its colour). Undo and redo with Ctrl+Z and Ctrl+Y; zoom with − and +, the wheel or two fingers, and move the view with the middle button or two fingers (see Zoom and move around).
Layers
The Layers panel lists the layers from the top: painting happens on the one chosen (outlined). For each layer:
- 👁 shows or hides it; Opacity of the layer makes it see-through;
- +▦ adds a painted layer above the chosen one, +◇ a vector layer; ⧉ duplicates it; ▲ ▼ move it; ⤓ merges it with the layer below; ✎ (or a double click) renames it; 🗑 deletes it;
- 🖼+ Import a picture puts a picture of the device on a new layer — made smaller to fit if it is larger than the canvas, its transparency kept — to move where you want before clicking beside it;
- ⟳ turns the layer around its centre by any angle.
A vector layer holds shapes and texts that stay shapes: draw lines, rectangles, ellipses and texts on it, then with ⬚ Select click a shape to pick it — drag it or move it with the arrows, change its colour, size, opacity or fill with the controls, double-click a text to change it, Delete removes it. Painting tools (brush, fill…) do not work on it: ◇→▦ makes it pixels.
The picture
| Button | Does |
|---|---|
| ✂ Crop to the selection | keeps only the part selected, on every layer |
| ⟲ ⟳ | a quarter turn to the left or the right; the width and height swap |
| ∠ Rotate by an angle… | any angle: the canvas grows to hold the picture, the new corners transparent |
| ⇋ ⇅ | flip horizontally or vertically |
| 🖼 Background… | the bottom layer: a colour, transparent, or a picture that covers the canvas, fits in it, is stretched to it or stays at its size, centred |
| ▦ Grid… | lines every so many pixels (a decimal step: 5 mm at 96 dpi is 18.9), in the colour and opacity chosen — graph paper, pixel art |
Turning or flipping makes vector layers pixels (asked first).
Transparency and saving
Transparent pixels show as a checkerboard. PNG, WebP and OpenRaster keep the transparency; a JPEG has none: transparent parts become white.
A picture with several layers, a vector layer, a hidden layer or a layer not fully opaque is saved as OpenRaster (.ora) — the open format of layered pictures, read by GIMP, Krita, MyPaint and Pinta — so that its layers come back here; Save as… → Flattened PNG gives a single picture for everything else. A picture with one opaque layer stays in its own format (PNG, JPEG, WebP). A painting inside a text document is always flattened (asked first).
The shapes of a vector layer are kept for this application inside the .ora file; other applications see that layer as pixels.